Carlos Bravo
on 29 August 2023
Closing the Gap: Ubuntu Pro in the AWS Shared Responsibility Model
Explore Ubuntu Pro’s role in the AWS Shared Responsibility Model plus walk through a real-world example to install your own Mastodon server on Ubuntu Pro
Deploying your application on a public cloud offers numerous benefits, including improved time to market, elastic capacity, and improved baseline security compared to on-premises solutions. However, this does not guarantee better security coverage for your application and data. For this reason, the major cloud providers provide a Shared Responsibility Model, which outlines the distribution of security responsibilities between the cloud service provider and its customers.
In this blog post we will examine the synergy between Ubuntu Pro and the AWS Shared Responsibility Model. We will then present a practical example by installing a Mastodon Server to illustrate how Ubuntu Pro’s features effectively safeguard your application.
The AWS Shared Responsibility Model
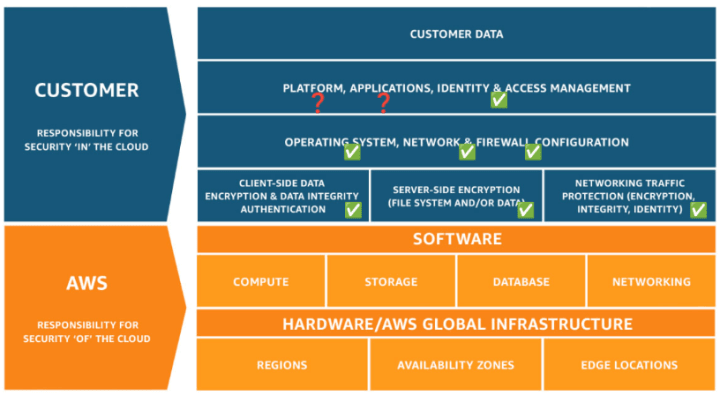
The AWS Shared Responsibility Model is based on the principle that security is a shared responsibility, with the model serving as a guide to determine who is responsible for securing different components of the IT infrastructure. AWS tackles the “operational burden” of managing and securing the physical infrastructure (referred to as security “of” the cloud), while the customer assumes responsibility for the OS, applications, and the virtual infrastructure (referred to as security “in” the cloud). This includes tasks such as managing virtual networking, firewalls, and monitoring tools. The scope of security coverage may vary depending on the services chosen by the customer. For example, using managed services can shift some of the security responsibility to the cloud service provider.
AWS Shared Responsibility Model

If we think of a real-world example, when you deploy an application into an EC2 instance, the services that typically require attention are the virtual network (VPC) and its subnets, network routes, NATs, Internet Gateways, and security groups (firewalls) for your servers plus a set of monitoring tools for access, logs, and security scanning.
So we should have everything covered, right?
If we look carefully back at the AWS Shared Responsibility Model, even if configured correctly, a security gap still exists at the application layer which includes the instance’s operating system and the platforms and applications running on it. While public clouds provide useful tools to simplify monitoring and updates, the responsibility for securing your server and getting the appropriate security patches for the server and the complete stack still lies with you as the customer
AWS Shared Responsibility Model coverage

Taking a deeper dive into the model, if you are running on a current Ubuntu LTS release (or any other current operating system offered by AWS at the time of this writing), you already have basic OS coverage. However, the rest of the stack (platform, applications and its dependencies) will remain vulnerable and, if a security vulnerability is found in one of your application packages or dependencies, it may not be covered by the OS core repository (e.g. Main repository in Ubuntu), and you will be stuck waiting for the community to address the issue. And, to make things even more complicated, just one single application, such as Redis, NGINX, or MongoDB, can have hundreds of lower-level package dependencies. Are you willing to accept this risk? Fortunately, a solution is available.
What does Ubuntu Pro offer in application security?
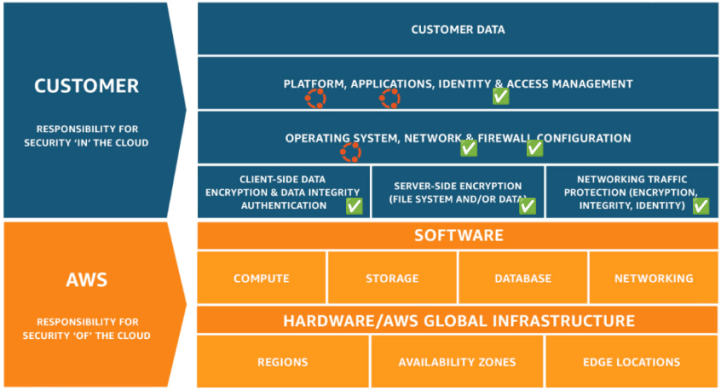
Introducing Ubuntu Pro, which is hailed as the most comprehensive subscription for open-source software security. It offers several security benefits tailored to make your cloud deployment more secure, ensuring your application stack is updated and protected against high and critical CVEs. This makes Ubuntu Pro a key complement for the AWS Shared Responsibility Model, as it covers where the cloud tools cannot reach.
Let’s delve deeper into the security advantages you can gain through the utilisation of Ubuntu Pro.
Kernel Livepatch
Kernel Livepatch is designed to provide a way to automatically apply critical security patches to the Linux kernel without requiring a system reboot. Traditional kernel updates often require a system reboot to take effect, which can result in downtime and disruption to running applications. This helps to maintain system uptime and reduce potential service interruptions.
Extended Security Maintenance (ESM) for Applications
Extended Security Maintenance (ESM), a benefit of Ubuntu Pro, provides extended security updates and maintenance for critical and high CVEs. Additionally, while Ubuntu LTS provides coverage for only the Ubuntu Main repository (2,300+ packages), Ubuntu Pro provides coverage for all open-source software packages found in the Ubuntu Universe repository (23,000+ packages).
The Ubuntu Universe is a snapshot of the free, open-source, and Linux world, housing a wide range of open-source software packages, all built from a range of public sources. Canonical does not provide a guarantee of regular security updates for software in the universe component but does provide updates when they are made available by the community. Utilisation of these packages creates an inherent risk to its users. To reduce this risk, you would need to contract support services with individual –often multiple– vendors to ensure you have the necessary support level for all your applications and runtimes. Even by doing this, it is typical that lower-level dependencies (often in the hundreds) are not covered, leaving a security gap in place.
Ubuntu Pro addresses this security gap by providing security patching to all the 3rd party Open Source packages present in the Universe repository, for ten years since the release date, providing you security, stability and consistency.
Ubuntu Security Guide
We have, so far, covered security patching from the running kernel to the entire stack of open source applications. The last bit you need to take care of is about configuring your server to minimise the attack surface as much as possible. This is where the Ubuntu Security Guide, or USG, comes in.
The Ubuntu Security Guide is a tool that not only helps you benchmark against hardening standards such as CIS or DISA-STIG but also guides you through the hardening process by running automated configuration scripts. Currently, it includes CIS and DISA-STIG profiles for Ubuntu 20.04 and only CIS for 22.04 at the time of writing.
Let’s see this in practice!
A real-world example: Installing your own Mastodon server on Ubuntu Pro
To see Ubuntu Pro in action, let’s take a step-by-step journey through the configuration of your Mastodon server. This example highlights the benefits in a relevant scenario and utilises some of the most widely used open-source applications and runtimes, such as PostgreSQL, NginX, Redis, NodeJS, and Ruby.
Note: If you are running a production environment, the recommendation is to decouple as many services as possible. As an example, PostgreSQL should run on Amazon RDS, Redis could be replaced by Amazon ElastiCache for Redis and S3 for object storage.
We will follow the official guide at https://docs.joinmastodon.org/admin/install/
For this exercise, I am deploying an Ubuntu Pro from EC2 AMI, specifically version 20.04 LTS Pro. This version offers a “pay as you go” pricing model with the price determined by the machine size. This pricing model simplifies the management of costs, allowing for better control, especially under autoscaling scenarios.
If you are a web user, you can launch the AMI directly from the AWS Marketplace. But if you are a CLI user, you can get the latest Ubuntu 20.04 LTS Pro AMI with the following command:
aws ssm get-parameters --names /aws/service/canonical/ubuntu/pro-server/20.04/stable/current/amd64/hvm/ebs-gp2/ami-id
Note that using Ubuntu Pro does not require special considerations compared to the regular Ubuntu versions, as its features are activated by default and security updates are provided as regular apt repositories.
Hardening your server with USG
To get started, your first task is to configure or harden your server. This can be done manually based on your expertise or you can use an industry benchmark, such as CIS or DISA-STIG. It is recommended that this be done before installing your application, as some specific settings can be overwritten during this automated process.
We will use the CIS benchmark for this exercise, which comes in two levels and is tailored for desktop and server in USG.
From the CIS website:
The Level 1 profile is considered a base recommendation that can be implemented fairly promptly and is designed to not have an extensive performance impact. The intent of the Level 1 profile benchmark is to lower the attack surface of your organisation while keeping machines usable and not hindering business functionality.
The Level 2 profile is considered to be “defence in depth” and is intended for environments where security is paramount. The recommendations associated with the Level 2 profile can have an adverse effect on your organisation if not implemented appropriately or without due care.
CIS Benchmarks™ FAQ – https://www.cisecurity.org/
For this exercise, we are going to harden this server using the CIS Level 1 benchmark, which is very straightforward on Ubuntu Pro.
Step 1: Enable and install USG or the Ubuntu Security Guide:
sudo pro enable usg
sudo apt install -y usg
Step 2: After the installation is complete, run the automated hardening script, specifying the CIS Level 1 benchmark as follows:
sudo usg fix cis_level1_server
This process will run a quick audit and run specific configurations to fix any non-compliant configuration issues. While this can take more than 30 minutes in a micro instance, it is considerably faster on bigger instance types. Once completed, your hardened server will be compliant according to the CIS Level 1 benchmark. To verify, you can audit your server with the following command, which will generate an HTML file with the result.
sudo usg audit cis_level1_server
Installing the software
Now that we have a CIS-hardened Ubuntu 20.04, we can move forward with the installation.
According to the Mastodon install guide, the main steps in this process are as follows:
- Installing the basic requirements
- Installing NodeJS
- Installing or configuring PostgreSQL
- More dependencies
- Yarn
- Ruby
After completing the first step, which is about installing basic requirements, you are to install NodeJS 16.x from an external repository. Although I usually recommend installing it from the official Ubuntu repositories as it is simpler to install and provides committed security support throughout the life of the operating system, we want to ensure that we do not break any critical functionality in our application and will follow the guide as it reads. (Make sure to monitor and maintain this version for future updates).
Moving on to step 3, the installation and configuration of PostgreSQL is straightforward, especially if you prefer to use managed services and deploy the database on RDS.
Step 4 is where the setup becomes more interesting, as it requires the installation of 33 additional packages or dependencies for the rest of the stack. Examples include Imagemagick, ffmpeg, nginx, redis, among others.
apt install -y \
  imagemagick ffmpeg libpq-dev libxml2-dev libxslt1-dev file git-core \
  g++ libprotobuf-dev protobuf-compiler pkg-config nodejs gcc autoconf \
  bison build-essential libssl-dev libyaml-dev libreadline6-dev \
  zlib1g-dev libncurses5-dev libffi-dev libgdbm-dev \
  nginx redis-server redis-tools postgresql postgresql-contrib \
  certbot python3-certbot-nginx libidn11-dev libicu-dev libjemalloc-dev
After completing the installation, I wanted to investigate how many of these dependencies already had security patches installed from the ESM repositories.
To see these results, I wrote the following:
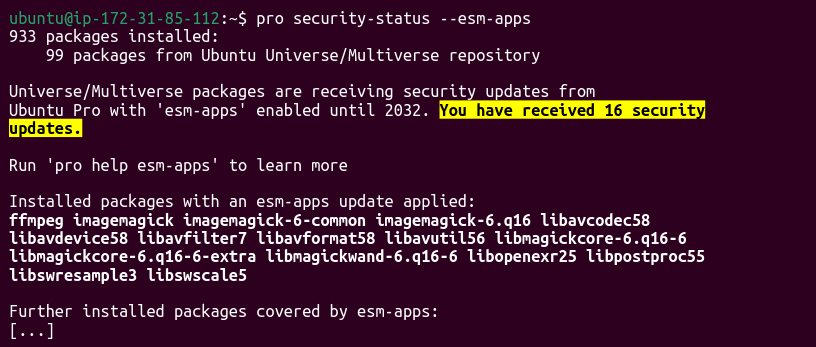
pro security-status --esm-apps

If you are like me and think that “seeing is believing”, you can query the list of installed packages and filter by the ones with ESM versions using the following:
dpkg-query -W | grep esm

Ubuntu Pro applied 16 security updates were automatically installed which are currently unavailable in the regular repositories. In the image above, you can see commonly used packages like ffmpeg with its codecs and utilities, as well as the popular in-memory data store Redis, for caching data.
Now, let’s look at what happens if we repeat the process on Ubuntu 22.04 Pro?
To start, I created a new EC2 instance with Ubuntu 22.04 LTS Pro and went through the same process outlined above. Once completed, I received a different list of packages with security patches from ESM:

Again, there are 16 packages that, without Ubuntu Pro, would make my application vulnerable to known CVEs.
After completing the installation, I also wanted to check Kernel Livepatch and verify there were any security patches implemented.
By running `canonical-livepatch status` you can see whether Livepatch has found and applied security fixes to the kernel. This is what I got in my Ubuntu 20.04 server:

From the above image, “all applicable livepatch modules inserted” verifies that Kernel Livepatch has already inserted security patches to the kernel. To see the list of fixes, type `canonical-livepatch status –verbose` and the full list will be generated including the CVE number reference. In my example, the list contained 29 applied fixes.
Final Comments
While the cloud providers ensure the security of their infrastructure and platforms, it is the responsibility of the customer to secure what runs on it. AWS offers various tools to assist in securing and monitoring your security environment, however, when it comes to the application realm, the onus is on you as the customer.
Ubuntu Pro addresses these security gaps by providing full security coverage for all OSS, extending the main Ubuntu security coverage period, including all applications present in the Universe repository and adding additional security tools such as USG and Kernel Livepatch.
Through the adoption of Ubuntu Pro, customers can establish comprehensive coverage to fulfill their responsibilities outlined in the AWS Shared Responsibility Model.


